
Explore products
Discover tools to enhance forms, streamline orders, ensure compliance, and extract customer data effortlessly
Frequently asked questions
Find quick answers to your most common questions.
Hi Katrina By default, there are four order status: Abandoned, Submitted, Completed, Trash. You cannot rename the default status, but you can choose to hide a default status.
When you enable automated as well as manual payments in your form, the default order status will include Abandoned, Submitted, Paid, Completed, Trash.
Abandoned orders
If a user starts filling the form, but does not submit it, it will be displayed in the Abandoned status. These orders will be displayed only in the Neartail Orders page and it will not be included in Reports. Abandoned orders will have * prefixed to the order number in the Neartail Orders page.
Submitted orders
When the user chooses the automated payment option and submits the form, the order will be displayed under the Paid status. When the user chooses the manual payment option and submits the form, the order will be displayed under the submitted status. Once you verify the payment and update the payment status, it will be moved to the Paid status. These submitted orders will be recorded in Neartail and Google Forms. You can sync Google Forms responses to Google Sheets. Submitted orders will have # prefixed to the order number in the Neartail Orders page. The order numbers should be in sequential order.
Trash orders
You can move redundant orders to Trash. Login to Neartail > click on the form to open it > Edit page will be displayed > click Orders > In the Orders page, you can drag and drop (place the cursor on the profile image/default icon to drag) orders to the Trash status or click on an order to view the details, select the Trash status from the dropdown list for the Move to option and click Submit.
Delete orders
The orders in Abandoned and Trash status will not be included in the Neartail Reports. You can enable the Privacy option to delete the orders in Trash status permanently.
Login to Neartail > click on the form to open it > Edit page will be displayed > click Orders> In the Orders page, click on the three dots next to the Abandoned or Trash status > You can enable or disable the privacy settings. When enabled, the orders in Abandoned and Trash status will be automatically deleted after 7 days. Please note that the Abandoned status will be hidden when the Privacy option is enabled.
Read the full thread
Hi James, You can customize the footer, header, theme, logo, but please note that this is common for all the forms you create using your account.
Customize header, footer, theme
Login to Formfacade. Click on the form to open it. Edit page will be displayed. Click Preview. In the Preview page, theme settings will be displayed in the right pane. Click Page. Enter the required text in the Business name (header / account name), Footer option (replaces "This site belongs to...") and click Save. You can upload your logo (square image 1:1 aspect ratio) to replace the default profile picture in the footer.
Read the full thread
Submit failed: Not able to update in google forms
https://prnt.sc/C9idKb4uTbtI
When the user submits the form, the response is recorded in Formfacade and Google Forms. If there are any issues with submitting the form or recording the responses in Google Forms, we show an error message to the user and also send a notification email to the form creator. The submit can fail because there is an issue with the form, internet connectivity issue etc. The notification email will include the error message, draft id, link to the response (abandoned or submitted). If the draft id is prefixed with the *, it indicates that the response has not been submitted. If it is prefixed with a #, it indicates that the response has been submitted.
If the error for response shows "Not able to update this response in Google Forms", then this indicates that the submit was successful and the response was recorded in Formfacade, but it was not updated in Google Forms. Google Forms might reject the responses if it fails any response validations (incorrect answers, missing answers for required questions) or if you have enabled any of the features that require signin such as limit to 1 response, collect email address - verified input, send response receipts, response too large etc. You might have also noticed that sometimes Google Forms throws a "Something went wrong" error without giving any additional details.
Request entity too large error
https://prnt.sc/d2hkzBekDrAv
You have added 28 paragraph questions in your form. When the user fills the answer for these paragraph questions along with other required questions in the form, the resulting response exceeds the size limit supported by google forms. That's why you are getting the entity too large error. To fix this, you can add a response validation for these paragraph questions to restrict the max characters or you can enable the option to not record the responses in google forms.
Login to Formfacade > click on the form to open it > Edit page will be displayed > In the Formfacade Edit page, click on the form title to select it > click on the settings gear icon > Form settings page will be displayed > click Advanced > enable the toggle button for "Don't submit to google forms" and click Save. When this option is enabled, the responses will be recorded only in Formfacade.
Read the full thread
Yes, you can use the Formfacade addon to embed a google form with file upload on your website. Google Forms file upload requires login. You must customize your google form using the Formfacade addon to convert this into a html file upload to allow users to upload files without login.
You can subscribe to the Formfacade - Embed paid plan. This plan is suitable for occasional light use cases that require collecting files. You get a 10mb max size per file with a total file storage of 1gb. Only the form owner can access the files one at a time after they login with their google account.
Formfacade - Embed
https://formfacade.com/embed/pricing.html
If your requirement is to collect large files and collaborate with your team, you should also subscribe to the file upload plan 10gb, 100gb or 1tb. You can increase the max file size to up to 1gb per file (depends on the plan), the number of files per file upload question, restrict file types, enable unlisted links to allow anyone to access the files, add collaborators to provide access to specific users and use our addon to sync the uploaded files to your google drive.
Formfacade - File upload
https://formfacade.com/file-upload/pricing.html
Convert to html file upload + Sync to drive
https://formfacade.com/file-upload/google-forms-file-upload-sync-to-google-drive.html
Read the full thread
Announcements
Read about our product updates and latest news
Sep 18, 2025
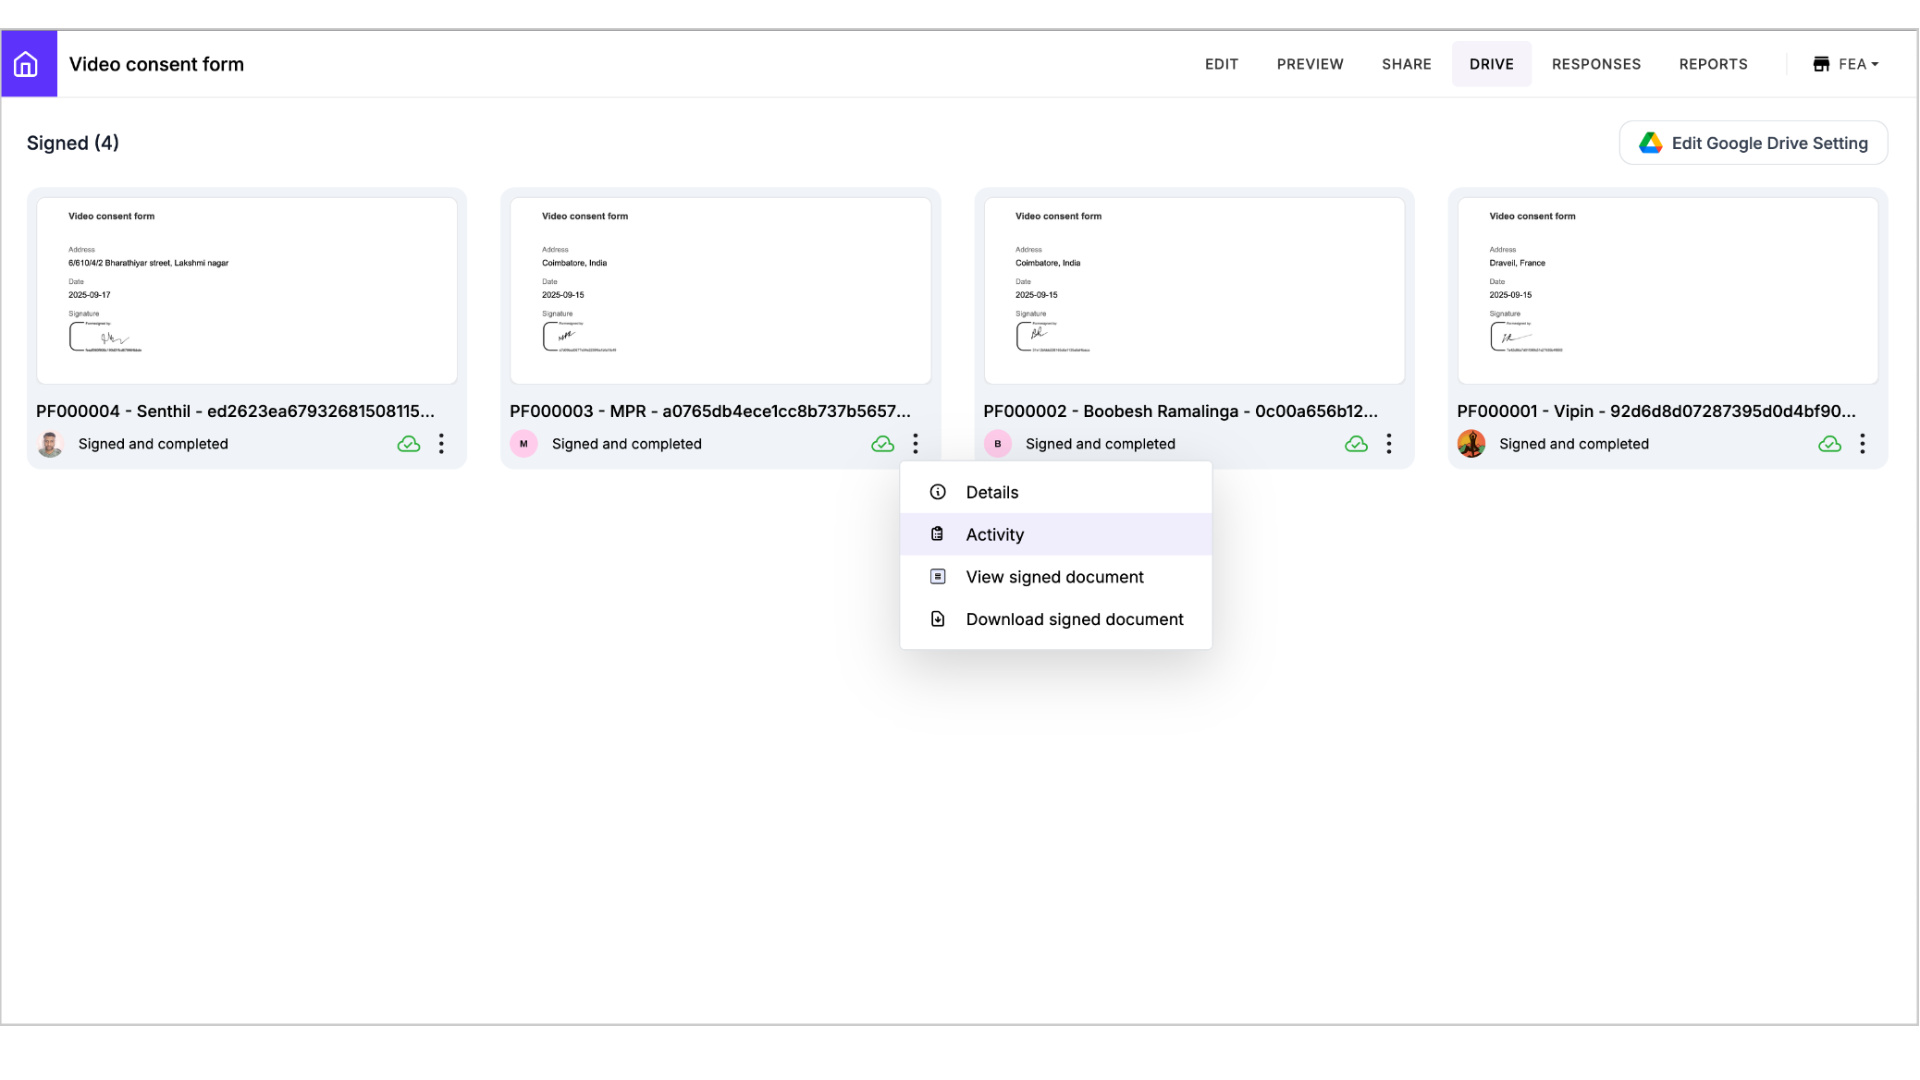
New feature: Manage your signed docs with the new Drive page
We’re excited to introduce the new Drive Page, a smarter way to view, sync, and manage all your signed documents in one place. With this update, you no longer need to switch between the Responses page, Google Drive folders, notification emails, or downloads. The Drive Page brings everything together, helping you organize signed documents and uploaded files seamlessly, with the flexibility to integrate with Google Drive.Drive page capabilitiesHere's a quick overview of what's possible with the new Drive page.📄 Quick document preview: Open any signed document instantly in an inline pr
Aug 25, 2025
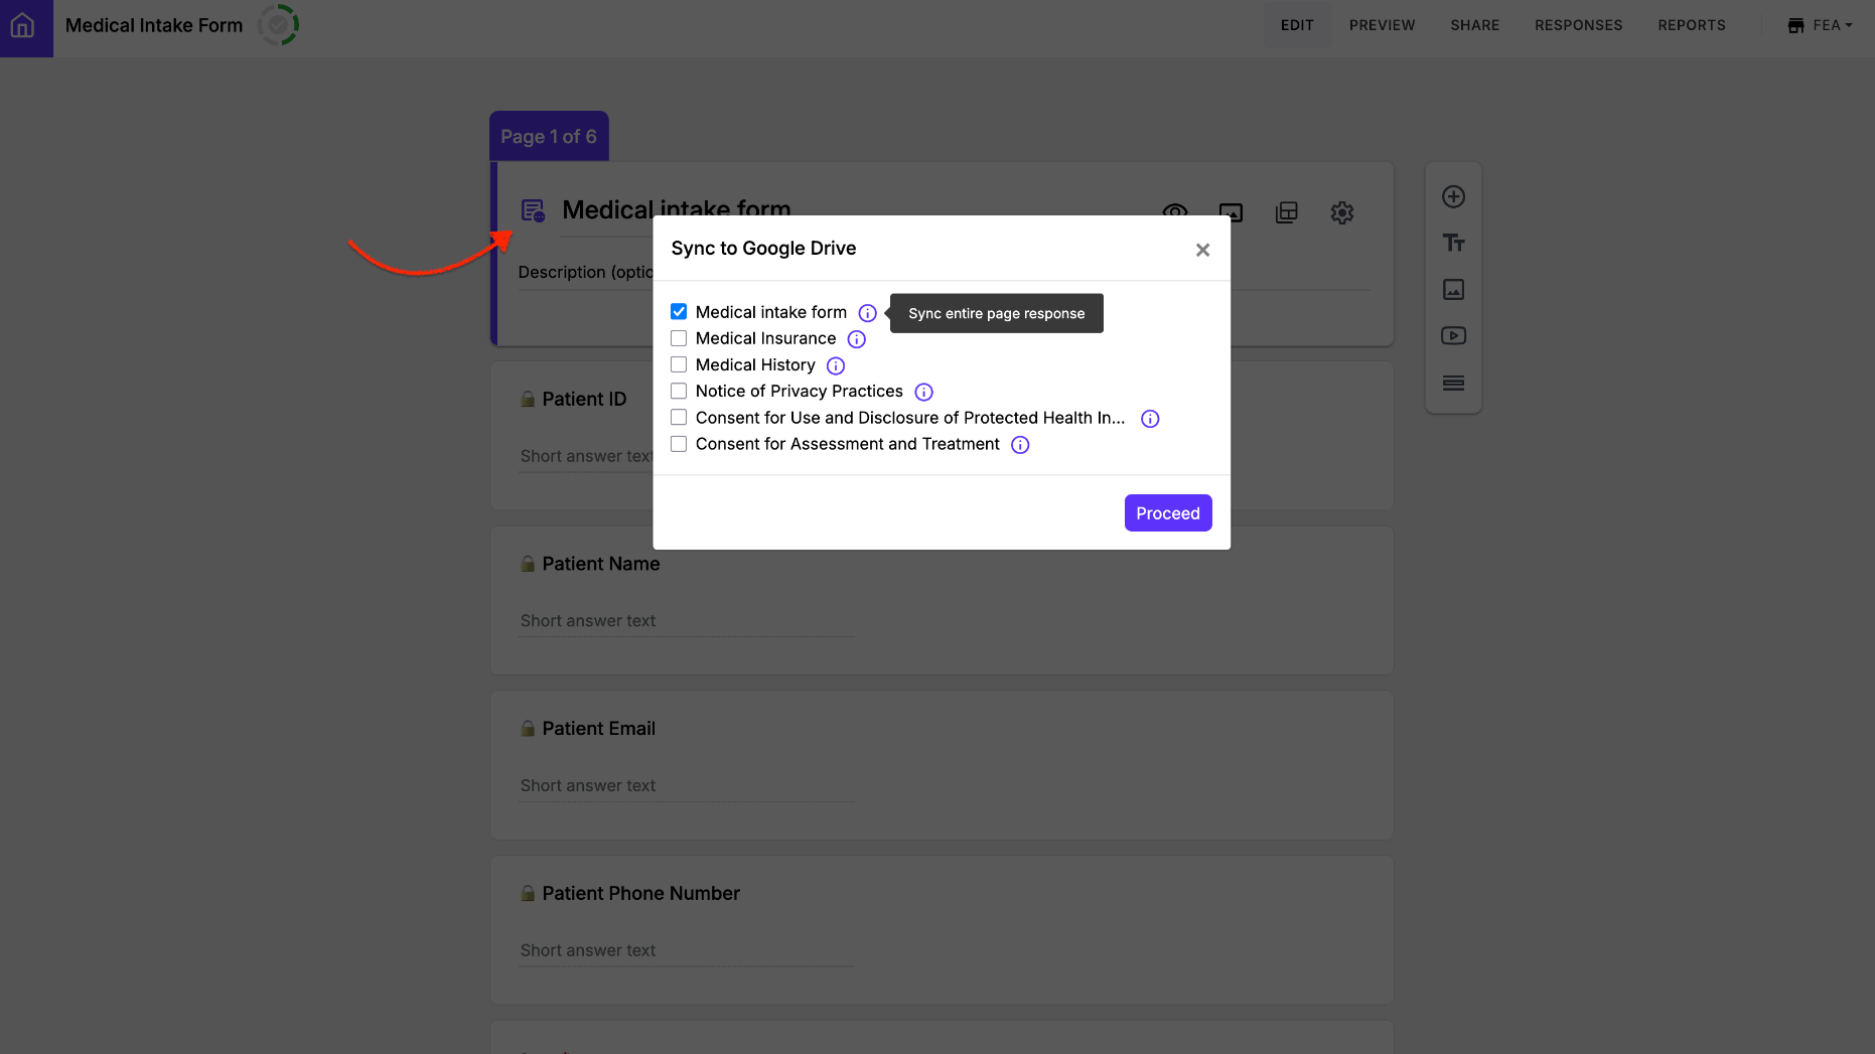
New feature: Generate PDF files and sync to Google Drive
We have just launched a major new feature in Formesign. You can now generate a separate PDF file for each page in your form and sync them directly to Google Drive. You can also seamlessly sync signed documents and uploaded files without needing the Google Forms addon. This update makes it easier than ever to organize, access, and share your form submissions with your team.What's newThis update brings three key improvements that make syncing with Google Drive more seamless, flexible, and organized.1️⃣ Set up sync directly in Formesign: Previously, you had to install the Formesign addon for

Aug 24, 2025
New feature: Embed attachments in signed PDF
Most use cases need signers to provide more than just a signature. They are often required to share supporting documents such as IDs, insurance details, receipts, or photos as part of the signing process. Formesign's file upload feature made it easy to collect supporting documents during the signing process. This helped teams replace messy back-and-forth emails with a simple, structured way to collect everything at the right moment.With file upload questions, you can define the accepted file types and have respondents upload the right documents as they sign and submit the form. The submit
Jul 24, 2025
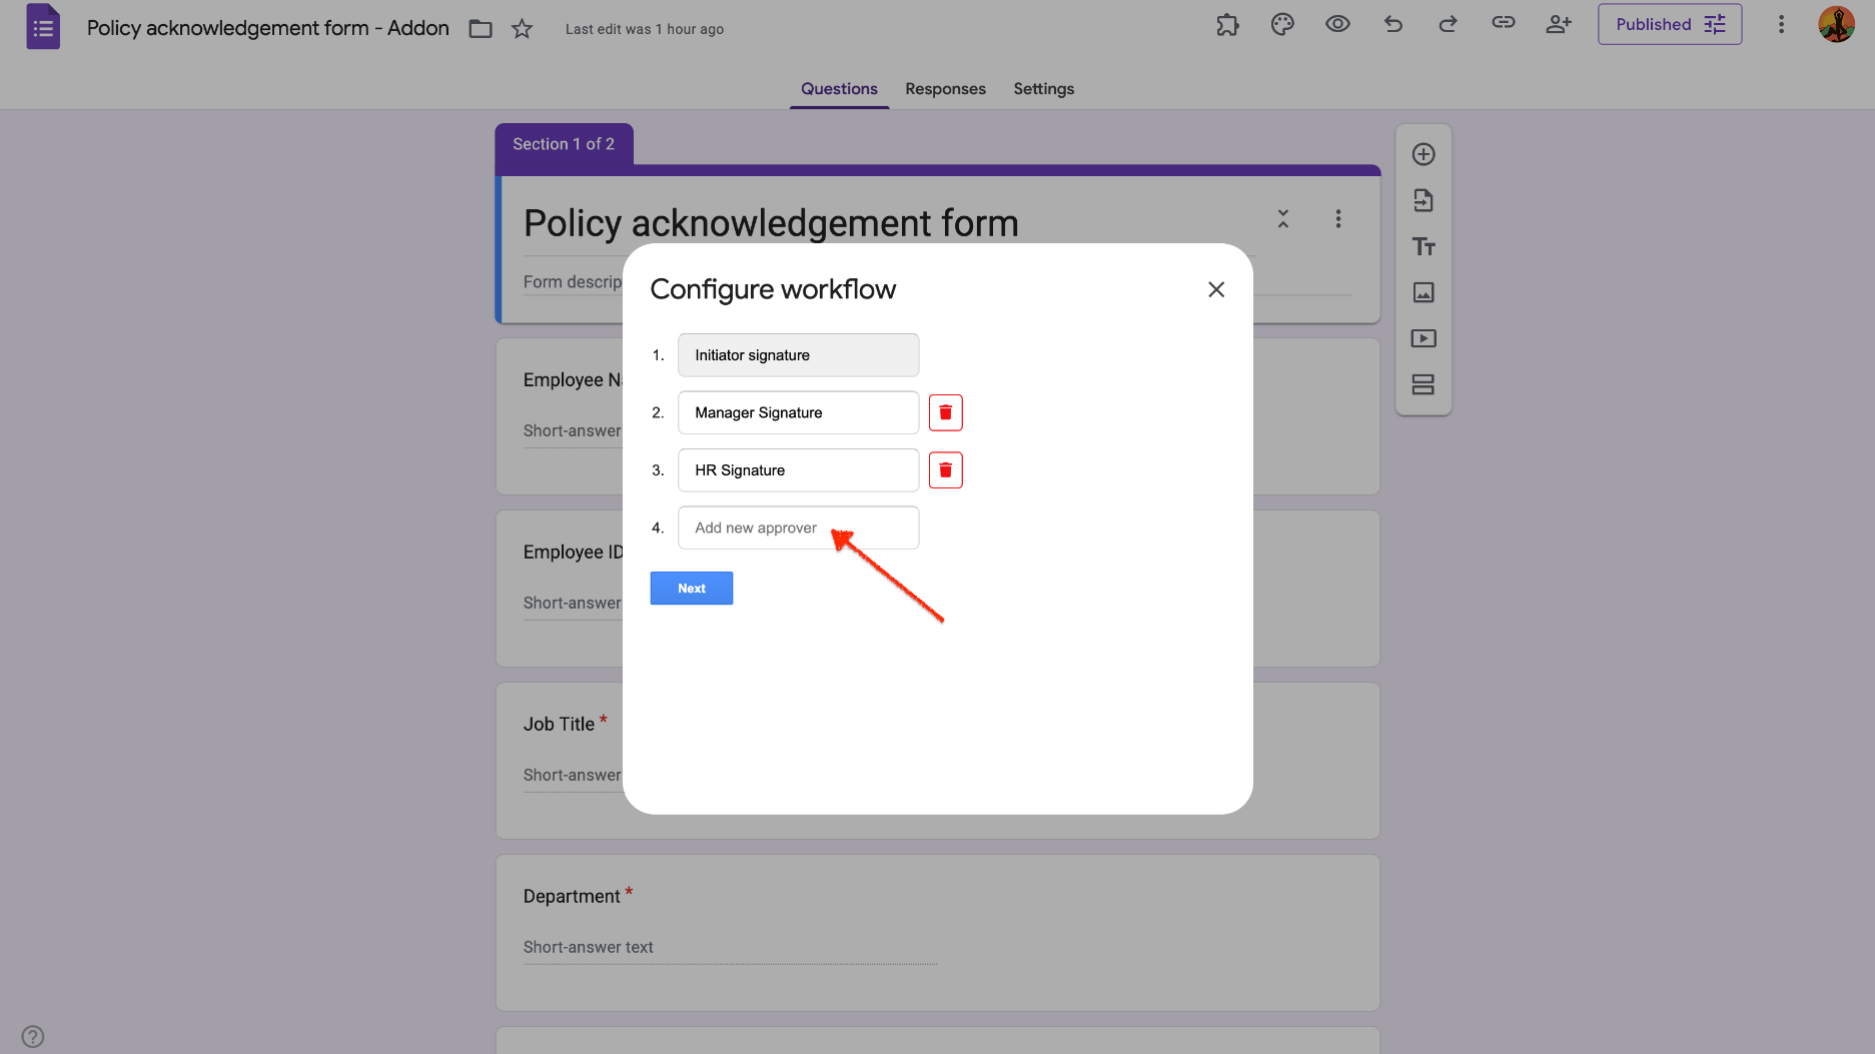
New feature: Redesigned signature workflow setup in Formesign
We’re excited to introduce a new feature in Formesign designed to simplify multi-step signature collection in Google Forms.Formesign now offers a streamlined and flexible signature workflow, making it easier than ever to collect multiple signatures. Whether you need to gather signatures from several users before a form is submitted (for example, a travel consent form signed by both the student and a parent), or require approval signatures from different individuals in a specific sequence and at different times (for example, an inspection checklist signed by the inspector, supervisor, and site
Jul 1, 2025
Forms Must Die
One week before my Y Combinator interview, my doctor told me I needed open-heart surgery to fix a leaky valve. I had just moved from India to France. I didn’t speak French, and I found myself explaining my medical condition over and over again to different doctors across multiple hospitals. Filling out forms and getting appointments became a full-time job. I remember thinking, what if I could just take photos of all my medical reports, email them, and the hospital’s system could automatically capture everything?Why Businesses Rely on FormsYears later, I found myself building digital intake for
May 1, 2025
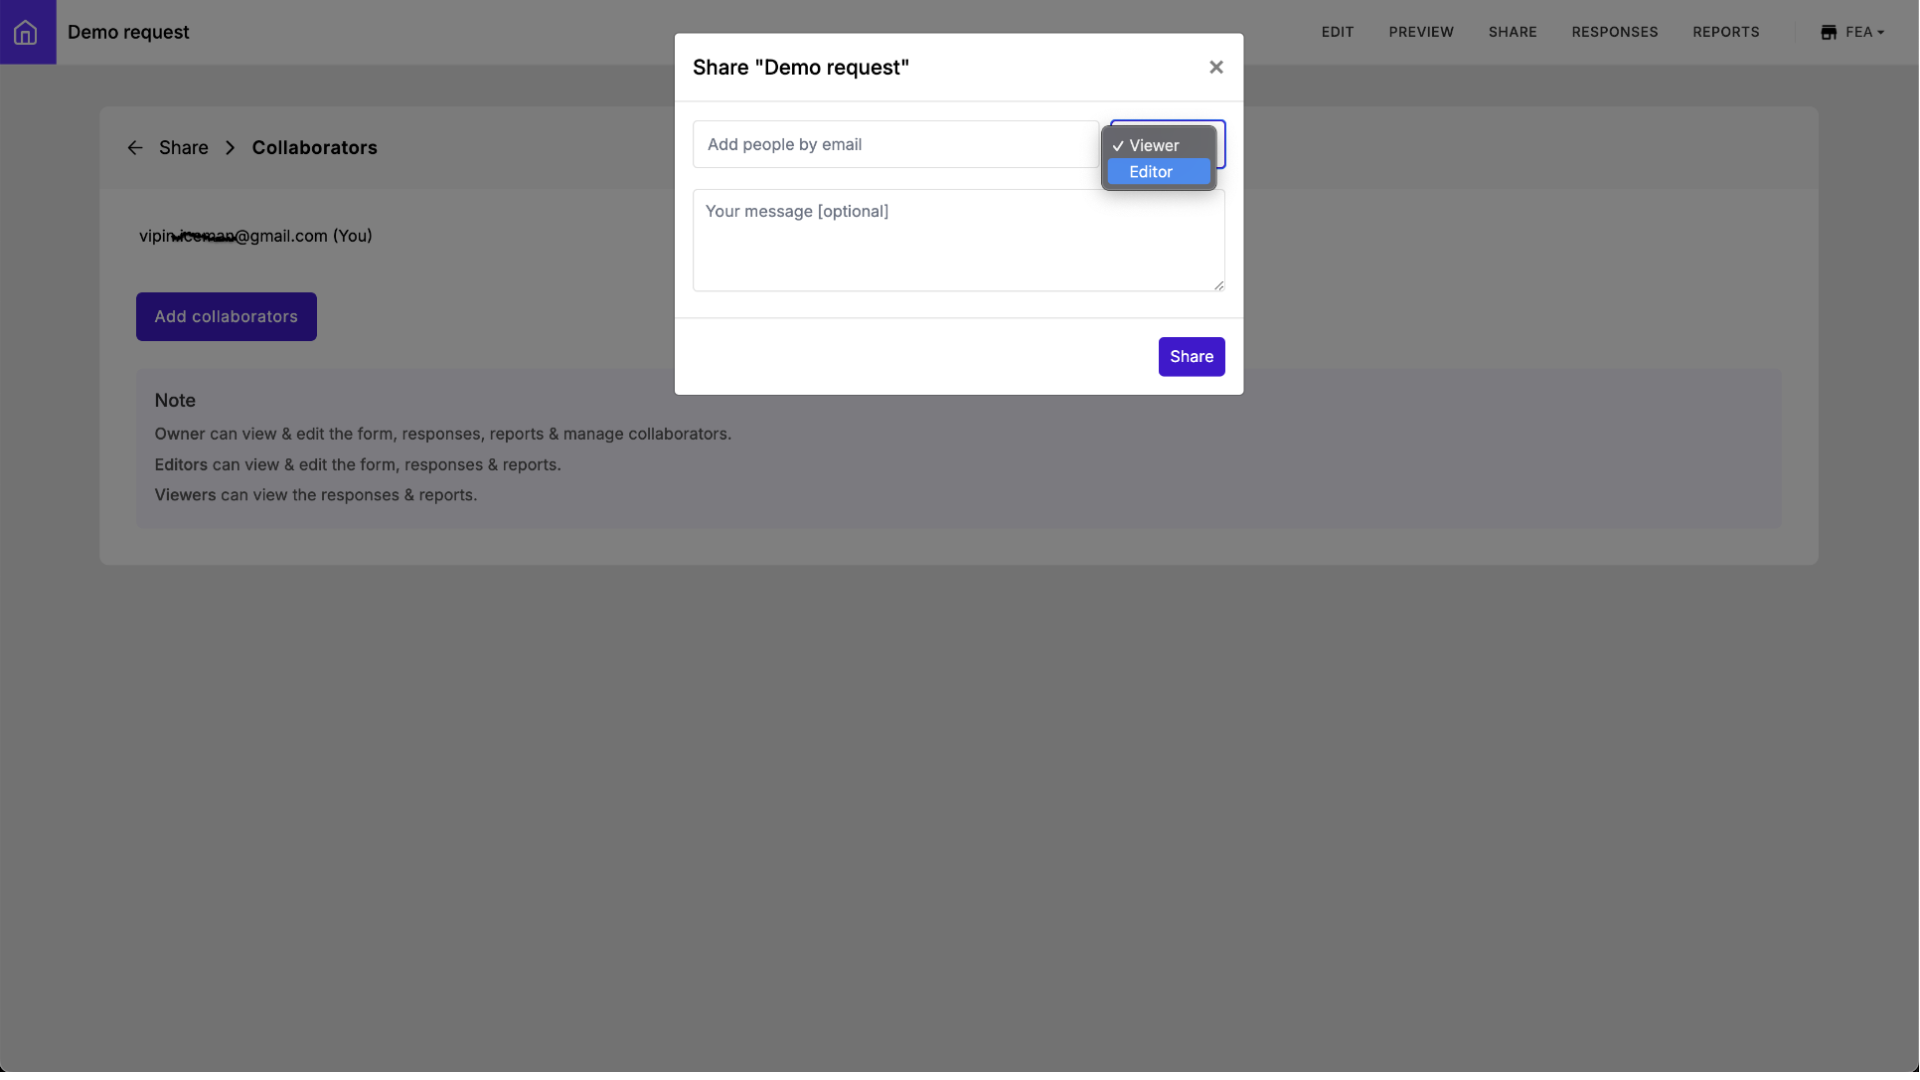
New feature: Granular permissions for forms and reports
We've introduced a powerful new feature that gives you greater control when collaborating with your team. You can now set up access controls to grant editor access to forms, allow team members to view, edit, and manage responses, and share specific reports with tailored permissions.Share form with collaboratorsYou can share forms with your team by assigning appropriate access levels to each collaborator. Collaborators can be added with either Editor or Viewer permissions:Editor: Has full access—can edit the form, view and manage responses, and create, edit, and share reports.Viewer: